Bulk Email Verification
Our Bulk Email Verification feature allows you to clean your email lists by uploading a file and verifying all the email addresses it contains. This guide will walk you through the process of uploading a list, analyzing it, and understanding the results.
Navigating to Bulk Verification
You can access the Bulk Verification feature from the main navigation menu on the left side of your dashboard.
- Log in to your Bouncify account.
- Click on Bulk Verification under the EMAIL VERIFICATION section in the sidebar.
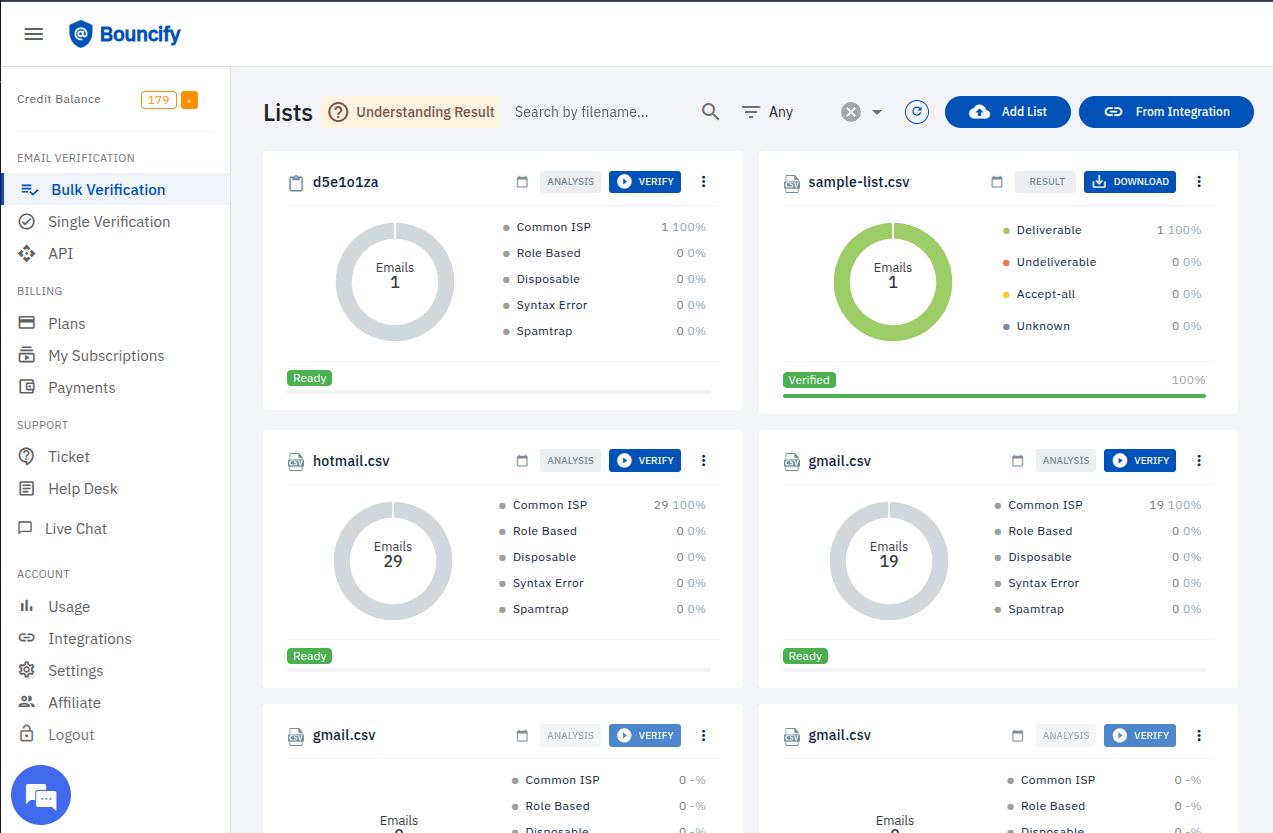
The Lists Dashboard
The main dashboard for Bulk Verification displays all your uploaded lists. Each list is presented as a card with key information and actions.
List Card
Each list card on the dashboard provides a snapshot of your email list's status:
-
Filename: The name of your uploaded file (e.g.,
sample-list.csv,hotmail.csv). -
Emails Donut Chart: A visual representation of the total number of emails in the list. The chart's color indicates the overall health of the list after verification.
-
Status: The current state of the list. Common statuses include:
Ready: The list has been analyzed and is ready for verification.Verified: The verification process is complete.Verifying...: The list is currently being verified.Invalid Data: The uploaded file has data format issues.Created: The list has been uploaded but not yet analyzed or verified.
-
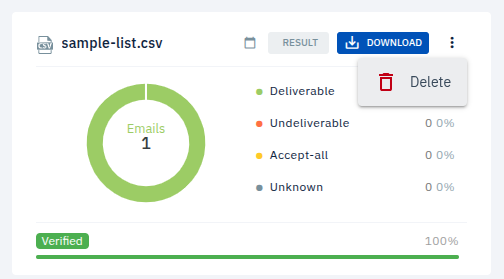
Analysis/Result Breakdown:
- Before Verification (Analysis): Shows a breakdown of email types like
Common ISP,Role Based,Disposable,Syntax Error, andSpamtrap. - After Verification (Result): Shows the final status of the emails, such as
Deliverable,Undeliverable,Accept-all, andUnknown.
- Before Verification (Analysis): Shows a breakdown of email types like
-
Actions:
- ANALYSIS: Displays the list analysis to provide an initial breakdown of email types.
- VERIFY: Starts the email verification process for the list.
- RESULT: Displays the detailed verification results.
- DOWNLOAD: Allows you to download the verification results.
- Delete: Deletes the list permanently.
Managing Your Lists
At the top of the dashboard, you have several options to manage your lists:
- Understanding result: A link to documentation explaining the different verification statuses.
- Search by filename...: A search bar to quickly find a specific list.
- Filter: Options to filter your lists based on their status.
- Add List: Upload a new email list for verification.
- From Integration: Import a list from one of your connected integrations.
How to Verify a List: Step-by-Step
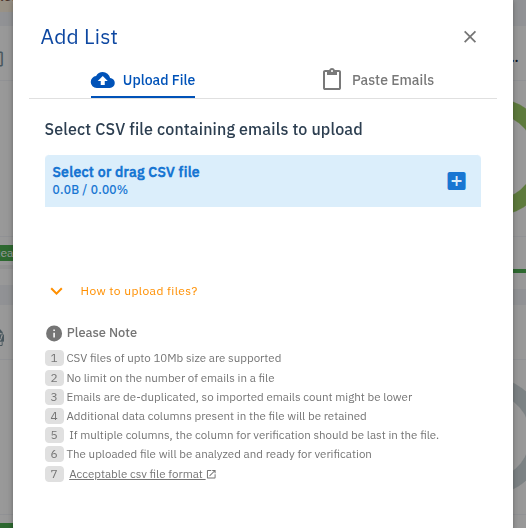
-
Upload Your List:
- Click the Add List button to open the upload modal.
- You have two options for adding emails:
- Upload File: Select or drag and drop a
.csvfile (up to 10MB). The file will be analyzed, and any additional data columns will be retained. - Paste Emails: Directly paste up to 1000 email addresses, with each one on a new line.
- Upload File: Select or drag and drop a
NoteFor lists with more than 1000 emails or those containing additional data, the Upload File method is recommended.
- Upload File
- Paste Emails

-
Verify the Emails:
- Once your list is uploaded, it will be analyzed automatically.
- Click the VERIFY button on the list card to start the verification process. The time it takes depends on the size of your list.
-
Review and Download the Results:
- Once the status changes to
Verified, click the RESULT button to see a detailed breakdown. - Click the DOWNLOAD button to export the results. You can typically choose to download all emails or segment them by their verification status (e.g., only
Deliverableemails).
- Once the status changes to
Regularly cleaning your email lists with our Bulk Verification tool helps improve your sender reputation, increase deliverability rates, and ensure your marketing campaigns reach real people.